If you’re like me, you love AI and really wish you could easily use your own data from your own sources. Well, I have news for you, that’s called Retrieval-Augmented Generation (RAG), and we’re going to build a simple RAG application using the AnyQuest.ai AI workflow tool in just a couple of minutes.
RAG helps large language models (LLMs) pull in information from external sources like company data, scholarly journals, and internal databases to improve their responses. Instead of relying only on what they were trained on, LLMs can use RAG to reference fresh, relevant information, making their answers more accurate and up to date. It also helps reduce errors, like making up false information or accidentally exposing sensitive data.
The AI Workflow We’ll Build
Cold outreach emails are a key part of business development. Researching and writing personalized messages for each prospect is time-consuming. We can automate this process, building relevant and persuasive emails in AnyQuest.ai.
We’ll create an AI agent in AnyQuest that:
- Researches a specific person at a company.
- Gathers information about that company.
- Retrieves your company’s service catalog from a knowledge base.
- Generates a customized outreach email that maps your services to their needs.
Let’s get started!
Prerequisites
- Access to AnyQuest.ai If you don’t, request Platform Access or contact me for details.
- A document with your company’s services and value propositions. If you don’t have one, use our DataCurl Service Catalog.
Step 1: Set Up Company Data
Before we generate outreach emails, we need to provide the AI with information about your company’s services. AnyQuest allows us to upload content for AI agents to use during text generation.
1.1 Create a Data Folder
- Open your AnyQuest workspace, then go to the Content tab.
- Click Create New Folder and name it:
- DataCurl Service Database (for this example, but you can name it anything relevant to your business).
1.2 Upload Company Information
- Add a document listing:
- A description of your services
- Target industries
- Key benefits and differentiators
- Ideal customer profiles or personas
- (Or use ours for now: DataCurl Service Catalog)
- Upload the document to the DataCurl Service Database folder.
Now, your company data is stored and ready to be retrieved and used in our email builder.
Step 2: Build the AI Agent
Now, we’ll create an AI agent that will handle research and email generation. To create a new Agent:
- Go to Agents in AnyQuest.
- Click Create New Agent and name it:
- DataCurl Email Customizer.
Step 3: Define the AI Workflow
Our AI agent will include five components:
| Component | Purpose |
|---|---|
| Start Component | Takes input: person’s name & company. |
| Generate Component #1 | Researches the person. |
| Generate Component #2 | Researches the company. |
| Retrieve Component | Pulls in our company’s service data. |
| Generate Component #3 | Creates a customized outreach email. |
3.1 Add Components to Workspace
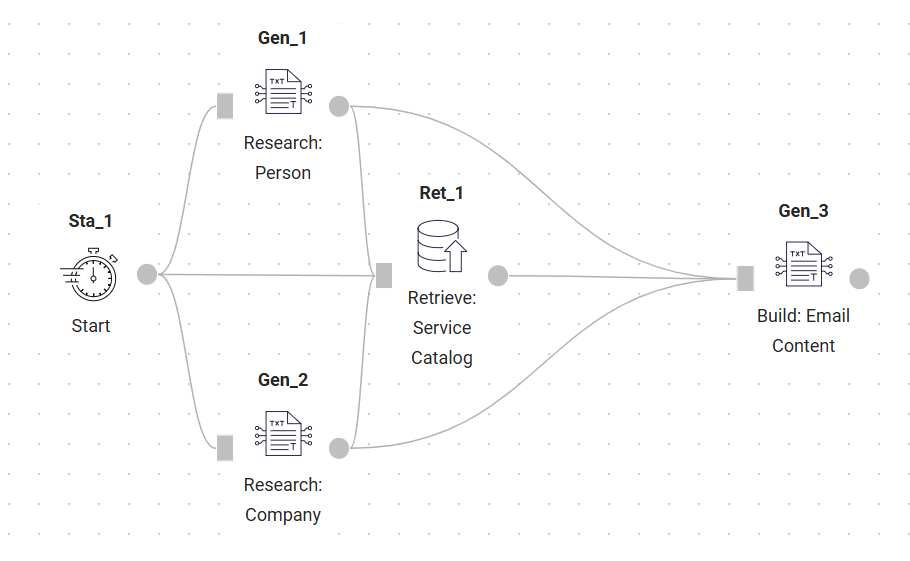
Add all components to your workspace, as shown in the diagram above. Note, for part of the process, we are running multiple generate actions at once. This is one of the many ways AnyQuest can speed up AI workflow runtime. Once done, connect them in the following order:
- Connect Start Component → to both Generate Components.
- Connect Generate Components → to the Retrieve Component.
- Connect the Retrieve Component → to the Final Generate Component.
3.2 Configure the Start Component
The start component will begin the user interaction. Start components offer a text box for input and will also accept file uploads. For our purposes, we’ll simply prompt the user for whom to research.
- Click on the Start Component
- User Prompt: Whom to research
3.3 Set Up Person Research
- Click on the first Generate component
- Use this prompt:
- Research this person for a cold email outreach.
- Then click the Properties tab:
- Accept all defaults except for:
- Title: Research: Person
- Tools: Add Bing Search Tool to gather information.
- Save
3.3 Set Up Company Research
- Click on the second Generate component
- Use this prompt:
- Research this company for a cold email outreach.
- Then click the Properties tab:
- Accept all defaults except for:
- Title: Research: Company
- Tools: Add Bing Search Tool to gather information.
- Save
3.4 Retrieve Service Catalog Data
- Click on the Retrieve Component
- Title: Retrieve: Service Catalog
- Input Folder: Select the folder you created earlier:
- DataCurl Service Database.
- Properties: Accept all defaults.
- Save
3.5 Generate the Personalized Email
- Click on the final Generate component
- Use the prompt below
- Note the use of content variables from previous steps:
- Person information → from Generate Component #1.
- Company information → from Generate Component #2.
- Service information → from the Retrieve Component.
- Then click the Properties tab:
- Accept all defaults except for:
- Title: Build: Email Content
- Output Format: Text
Prompt
Draft a personalized email to the person below at the company below offering the most appealing part of our service catalog.

## Person
{{Gen_1}}

## Company
{{Gen_2}}

## Service Catalog
{{Ret_1}}
Now, the AI agent is fully structured and ready to test.
Step 5: Test the AI Agent
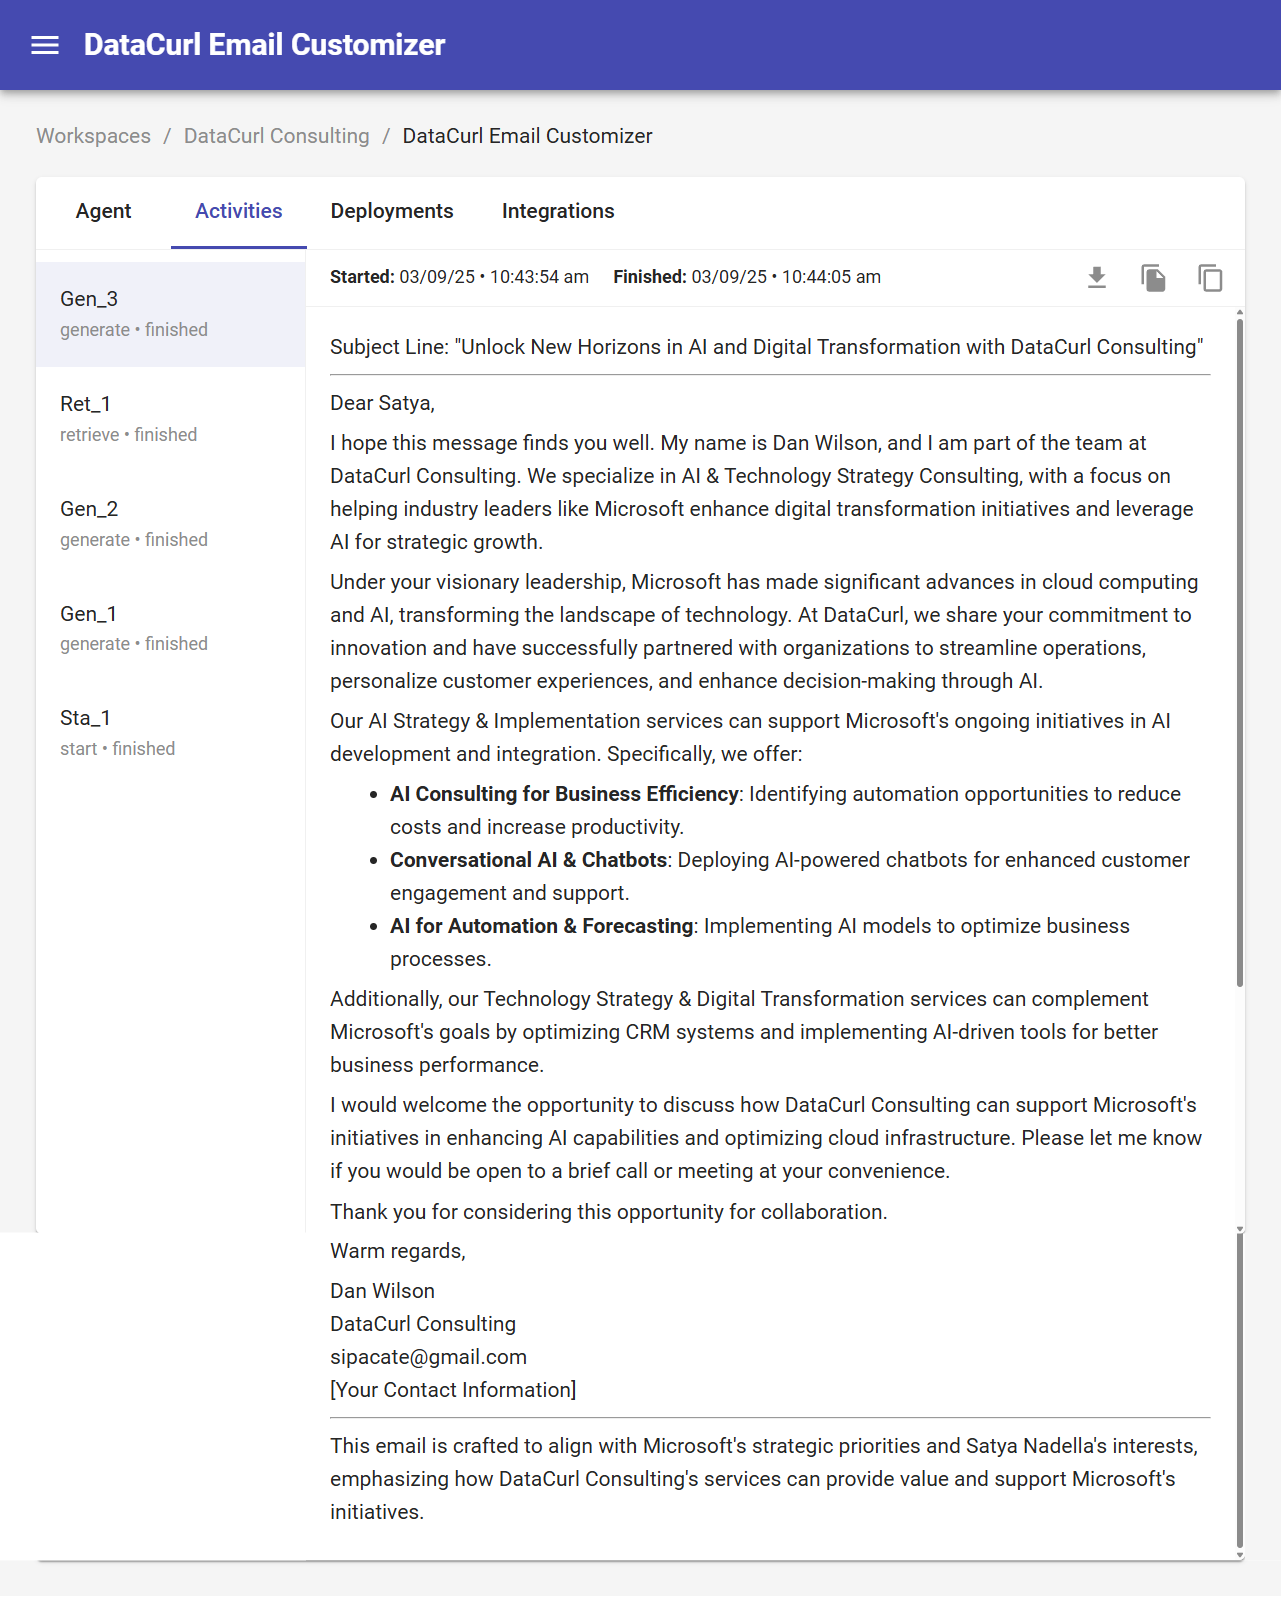
Let’s see it in action. Your input can be fairly loose, one of the benefits of AI. Though the more specific you are, the better the outcomes will be. Our new AI Agent will accept input like Satya at Microsoft or Jeff Weiner at LinkedIn, then proceed with the research tasks. For clarity, we’ll assume we entered Satya at Microsoft.
Test Run
- Input: Satya at Microsoft.
- Check the Activities Tab to monitor:
- Sta_1: Your input for research, like
- Gen_1: Fetches Satya Nadella’s details.
- Gen_2: Retrieves Microsoft company information.
- Ret_1: Loads your company’s service catalog.
- Gen_3: Creates a personalized email mapping your services, to the company and person above.
You can see the final result in this image.
Step 6: Deploy and Integrate
Now, let’s deploy the AI workflow. For this purpose, we’ll integrate it with email though there are other options like Slack channel integration and Web Hooks you can use to integrate the CRM or other system of your choice.
6.1 Deploy the Agent
- Click Deploy.
- Name this version: First Version.
6.2 Set Up Email Integration
- Go to Integrations Tab.
- Choose Email as the delivery method.
- Whitelist the AnyQuest domain to allow sending.
Now my completed email will be sent to the chosen mailbox, though this is purely a design decision. Your final workflow may be to send the completed email to a CRM, Database, or other step in your workflow.
Conclusion: AI Workflows Made Simple with AnyQuest.ai
Building AI-powered workflows used to require deep technical expertise, custom coding, and complex integrations. But with AnyQuest, you can create, deploy, and scale powerful AI applications without writing a single line of code.
In just a few minutes, we built an AI-driven personalized email outreach system that:
- Researches prospects in real-time
- Retrieves and organizes business insights
- Generates customized, high-quality outreach emails
- Deploys seamlessly and integrates with existing tools
With AnyQuest’s no-code interface, you’re no longer limited by technical constraints. You can:
- Build AI-driven workflows by simply dragging and connecting components
- Access powerful AI models with built-in integrations to research, generate, and retrieve data
- Automate and optimize business processes with structured, repeatable AI-driven outputs
- Deploy instantly and connect to your favorite tools like email, Slack, and webhooks
Why AnyQuest?
- Fast and intuitive – No coding required. Just design, connect, and deploy.
- Reliable and scalable – Create AI workflows that generate consistent and high-quality results.
- Versatile – From sales and marketing to research and customer engagement, AnyQuest can adapt to any use case.
- Easy integration – Connect with the tools you already use to streamline operations and drive efficiency.
With AnyQuest, AI isn’t just for developers. It’s for business owners, marketers, sales teams, and anyone who wants to harness AI’s power without the complexity.
Stop copy-pasting prompts. Start building AI workflows that work for you. Try AnyQuest.ai today and unlock the future of AI automation.